If you’re a developer responsible for a signup form, this guide is for you. If you’re building a signup flow, email quality is one of the first things that can break it.
Users mistype addresses, bots submit fake emails, and disposable inboxes slip through. Left unchecked, this leads to poor deliverability, wasted campaigns, and unreliable user data.
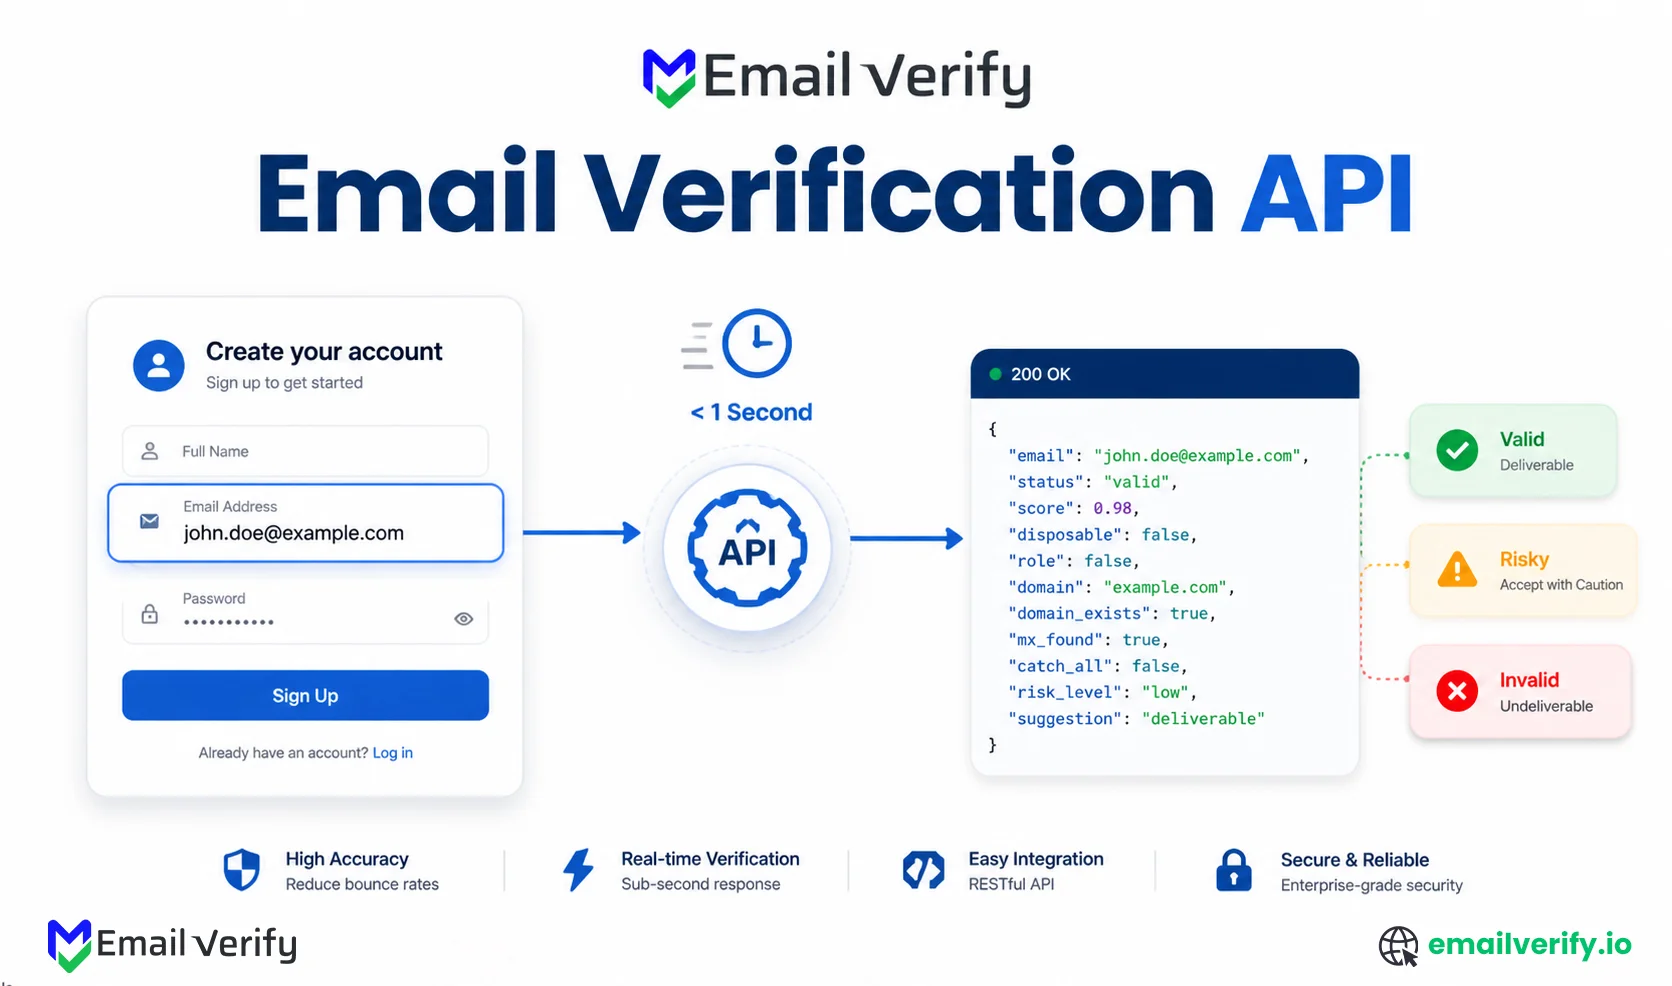
An email verification API solves this by checking whether an email is actually valid in real time, going beyond basic validation to analyze domain setup, mail servers, and mailbox behavior.
The integration itself is simple. The real challenge is doing it right:
- When to trigger verification
- How to handle slow responses
- What to show users for different outcomes
This guide walks through a production-ready approach, covering architecture, UX decisions, and code examples, so you can verify emails without slowing down your signup flow.
An email verification API is an HTTP service that evaluates whether an email address can receive mail by running checks like syntax validation, DNS resolution, MX lookup, SMTP probing, and risk classification.
It returns a structured response with a four-tier status model:
- Valid
- Risky
- Unknown
- Invalid
In a signup flow, the API should be called server-side during or just after form submission (ideally on field blur for real-time UX).
The correct implementation always includes:
- 1–2 second timeout fallback
- Soft acceptance for uncertain results
- UX mapping based on status tier, not raw technical errors
Most failed implementations break here by treating all non-valid responses as hard failures.
Table of Contents
What an Email Verification API Actually Does?
An email verification API is a structured abstraction over a multi-stage validation pipeline. When you send an email address, it typically executes the following:
- Syntax validation
- Domain resolution (DNS records lookup)
- MX record verification
- SMTP handshake with mail server
- Risk classification (catch-all, role-based, disposable detection)
Each stage contributes to a final classification rather than acting independently.
The key engineering detail is that SMTP probing introduces latency variance. Modern APIs handle this with connection reuse, retries, and provider-level optimizations so that responses stay consistent in sub-second ranges under normal conditions.
The integration question isn’t really “how do I call the API.” That’s an HTTP request, and any language can make one. The question is what to do with the response. Verifiers return graded confidence (Valid, Risky, Unknown, Invalid), and the difference between a good integration and a bad one is how it handles each tier. Most of this article is about that.
Email Verification API Response (Fields, Status, and Signals)
Most verification APIs return JSON with the same broad structure: a primary status, a reason code that explains it, and a set of underlying signals.
Here’s what a typical EmailVerify.io response looks like:
The fields that matter for your integration logic:
| Field | Why It Matters |
|---|---|
| status | The primary decision input. Branch on this first. |
| reason | Use to differentiate between Risky and Unknown (catch_all vs role vs disposable, etc.). |
| score | Numeric confidence, useful when you want a threshold rather than a categorical decision. |
| signals | Detailed flags. Useful for storing alongside the contact record. |
| provider | Hosting platform of the recipient (Google, Microsoft, etc.). Useful for later analytics. |
| checked_at | Timestamp. Useful for cache invalidation. |
Different vendors will use slightly different field names, but the shape is the same. The four-status pattern (Valid, Risky, Unknown, Invalid) is the de facto industry standard.
When to Call Email Verification API in a Signup Flow
There are three reasonable places to fire the verification call in a signup flow, and they’re all valid. The right choice depends on whether you want instant feedback, friction-free submission, or both.
Option A: On-Field Blur
Fire the API call when the email input loses focus (the user clicks away from it). This is the right default for most flows and the core principle behind any real-time email checker. The user has finished typing, the request goes off in the background, and by the time they click submit, the result is usually back. The submit-button experience feels instant.
Option B: On Form Submit
Fire the API call when the user clicks submit. Simpler to implement, but the user feels the latency directly. With a fast API and a sensible timeout, this is fine for low-volume forms; for anything user-facing in a competitive market, blur is better.
Option C: While Typing (Debounced)
Fire the API call after a short delay following each keystroke, canceling previous calls. Useful when you want to surface typo suggestions in real time (“Did you mean …@gmail.com?”). Adds complexity and cost, since you can fire several requests per signup, but the UX is the smoothest. Always combine with debouncing (covered in the next section) so you don’t burn API credits on every keystroke.
| Trigger | Best For | Trade-off |
|---|---|---|
| On field blur (default) | Most signup forms. Submit feels instant. | Slightly more complex than on-submit. |
| On form submit | Low-volume forms; back-office tools. | User feels the latency directly. |
| On typing (debounced) | High-conversion flows where typo suggestions matter. | More API calls per signup; higher cost. |
If you’re unsure which trigger to use, start with on-blur. It hits the sweet spot of cost, complexity, and UX for almost every form. You can layer on typo suggestions later if conversion data shows users would benefit from real-time correction.
How to Use Debouncing for Email Verification
If you verify emails during typing, debouncing is mandatory. Without it, every keystroke fires a new API request, you burn through credits, and you end up rate-limited within the first few signups. Debouncing waits a short delay after the last keystroke before firing and cancels any prior pending call.
An ideal debounce window is 400 to 800 milliseconds. Long enough that users finish typing the local part before the call fires; short enough that the user doesn’t notice the delay.
Calling the verification API on every keystroke without debouncing. We’ve seen forms make 30+ API calls per signup because the developer wired the call to onChange without a delay. The cost runs up quickly, the API rate-limits, and the user gets a flicker of changing statuses for partial addresses that haven’t finished typing.
Should You Verify Emails Server-Side or Client-Side?
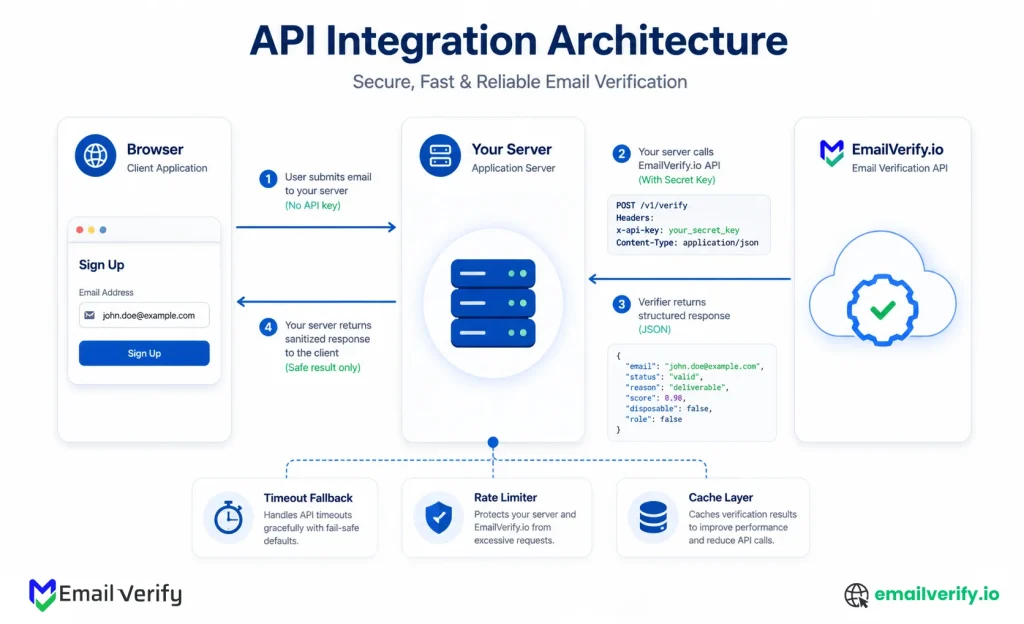
This is the most common architectural question. The answer is server-side, and the reason is your API key.
If you call the verification API directly from client-side JavaScript, your API key is in the page source where any browser can see it. A determined visitor extracts it, and now they have your credentials. They can verify their own addresses on your bill, share the key, or use it for purposes you didn’t authorize. The cost (and the abuse) is yours.
The right pattern is to expose your own API endpoint (something like /api/verify-email) on your application server, which forwards the call to the verification API with your secret key, then returns the result to the client. The client never sees the key, and you can add your own rate limiting, logging, and abuse handling around the call.
There’s exactly one valid scenario for client-side verification calls: a publishable / restricted-domain key designed for that use, where the vendor enforces origin restrictions on their side. EmailVerify.io and most verifiers don’t offer this; if yours does, the docs will be explicit about it. Default to server-side unless the vendor specifically says otherwise.
Code: Python (Flask)
Here’s a complete Flask endpoint that wraps the EmailVerify.io API. It accepts an email from the client, calls the verification API server-side, handles errors and timeouts, and returns the result to the client.
Code: Node.js (Express)
Same logic in Node.js with Express and the built-in fetch (Node 18+). Drop this into your existing Express app and wire the route into the form.
Code: PHP
PHP version using cURL, suitable for any framework or vanilla setup. The pattern is identical to the Python and Node versions: server-side call, timeout, soft-accept on failure.
Timeout and Fallback Strategy
The single most important thing your integration does is handle the case where the verifier doesn’t respond fast enough. Without a timeout fallback, a slow API call can block your signup form, fail every signup attempt during an outage, and turn your verifier into a single point of failure for new user acquisition.
The right pattern is a short timeout, a soft accept on timeout, and a flag for a later bulk recheck.
Specifically:
- Set the timeout to 1–2 seconds. Anything longer means the user notices.
- On timeout, return a status of “unknown” with reason “verifier_timeout.”
- In your application logic, treat verifier_timeout as a soft-accept: let the signup proceed, but tag the contact record so a bulk email verification run can revisit later.
- Log the timeout for monitoring. A sudden spike usually means the API is having a bad moment, not that your code is broken.
This pattern is the difference between a verifier that prevents bad data and a verifier that prevents legitimate signups. The first is what you want; the second is a self-inflicted incident.
If you ever see a spike in verifier_timeout reasons in your logs, don’t panic. The timeout fallback is doing exactly what it should. The next step is check your verifier provider’s status page, and if the issue persists, run a bulk pass over the soft-accepted contacts once the API returns to normal latency. None of those signups are lost; they’re just queued for re-verification.
Email Verification UX: What to Show Users for Each Status
This is where most signup integrations fail, not in the API call itself, but in how the results are translated into user-facing behavior.
Email verification APIs don’t just return “valid or invalid.” In production systems like EmailVerify.io, results are more nuanced and designed to reflect real-world email behavior.
The correct UX strategy is to map each status to a clear action: accept, warn, block, or defer, without overloading users with technical details.
| API Status | Meaning | Recommended Action | User Experience |
|---|---|---|---|
| Valid | Email is safe and deliverable | Accept | Proceed silently |
| Invalid | Email cannot receive mail (bad syntax, no mailbox, etc.) | Block | Ask user to correct the email. |
| Catch-all | The domain accepts all emails but mailbox validity is unclear | Accept | No message (silent accept) |
| Do-not-mail | High-risk or suppressed address (spam traps, abuse, or restricted) | Block | Prevent signup |
| Role-based | Shared inbox (info@, support@, admin@) | Soft warn | Suggest personal email |
| Unknown | Verification could not be completed (temporary failure, greylisting, etc.) | Accept (soft) | Proceed and recheck later |
| Skipped | Verification bypassed due to system rules or limits | Accept | No message |
- Valid: Email is safe and deliverable. Action: Accept. Message: None.
- Risky (Catch-all): Domain accepts all mail but specific mailbox is uncertain. Action: Accept (silently). Message: None.
- Risky (Role-based): Shared/distribution mailbox (info@, support@, etc). Action: Accept (optional soft-warn). Message: “Is this your personal email?”
- Unknown: Verification could not be completed (timeout, greylisting). Action: Accept (soft) and flag for bulk recheck. Message: None.
- Invalid: Mailbox does not exist or domain cannot receive mail. Action: Block. Message: “Please check for typos.”
Treating every invalid status as a hard block. Users who type a perfectly valid email at a catch-all domain (which is most small businesses and many enterprise addresses) will hit a wall they can’t solve, and your signup conversion drops measurably. The honest move is to accept catch-all addresses silently and let engagement data determine whether the mailbox is real over time.
How to Handle Risky and Unknown Statuses
Risky and Unknown deserve their own section because they’re where most teams get the integration wrong. They’re not the same status, they don’t have the same cause, and they shouldn’t be handled the same way.
Risky Addresses
“Risky” means the verifier got a response, but the response is ambiguous. The most common reasons are catch-all, role-based, disposable, or anti-probe behavior at major providers (Yahoo, AOL, and certain Microsoft tenants).
The right response to Risky depends on the reason code.
- Catch-all emails almost always means the signup should proceed because legitimate small-business addresses are catch-all, and you can’t filter on this without losing customers.
- Disposable emails usually means block, because disposable mailboxes don’t represent real users.
- Role-based emails usually means “accept with a soft warning.”
- Anti-probe usually means accept (the underlying mailbox is probably real; the verifier just couldn’t get a clean answer).
Unknown Addresses
Unknown means the verifier couldn’t get a meaningful response at all, usually because of a timeout, greylisting, or temporary server unavailability. This isn’t an address problem; it’s a verification problem. The right response is almost always to soft-accept the signup, tag the contact for later bulk verification, and move on.
Treating “Unknown” as “Invalid” is a self-inflicted wound. Most unknown addresses turn out to be valid on the next try. A signup form that blocks them is blocking real users on the verifier’s bad day.
| Reason code | Status | Default action | Why |
|---|---|---|---|
| catch_all | Risky | Accept | Legitimate addresses; can’t filter without losing real users. |
| role_based | Risky | Accept with soft warn | Real but lower-quality engagement. |
| disposable | Risky | Block | Almost never represents a real user. |
| free_provider | Risky | Accept | Gmail/Yahoo/Outlook are mostly real users. |
| anti_probe_provider | Risky | Accept | Mailbox is likely real; verifier just can’t see clearly. |
| verifier_timeout | Unknown | Soft-accept + flag | Re-verify in next bulk run. |
| greylisted | Unknown | Soft-accept + flag | Mailbox usually real; first probe failed. |
| server_unavailable | Unknown | Soft-accept + flag | Recipient infrastructure issue, not your problem. |
If you want the technical context behind why these reasons happen at the SMTP layer, our deeper guide on SMTP verification walks through the protocol-level mechanics for catch-all, greylisting, and anti-probe behavior.
How Should You Cache Email Verification Results?
If the same email is verified twice in close succession, you don’t need to call the API twice. A short-term cache cuts your verification cost meaningfully and improves perceived performance.
The right cache duration depends on the use case. For a signup flow, a short cache of a few minutes is plenty. For longer-lived caching across multiple flows, a longer cache makes sense, but it should still expire because mailbox state changes over time.
| Use case | Reasonable cache duration |
|---|---|
| Single signup form (retry protection) | 5 minutes. |
| Multi-step signup (same session) | 15–60 minutes. |
| Cross-flow caching (login + signup + ...) | Up to 24 hours. |
| Long-term contact record cache | Don’t cache; re-verify on a bulk schedule instead. |
How Do You Implement Rate Limiting for Email Verification APIs?
Once your verification endpoint is live and reachable from a public form, it’s a target. Bots will hit it for various reasons. Without rate limiting on your side, your verifier costs can spike unexpectedly.
The minimum rate-limiting setup includes:
- Per-IP rate limit on your /api/verify-email endpoint (e.g., 30 requests per minute per IP).
- Per-session rate limit (e.g., 10 verifications per session).
- CAPTCHA or similar challenge on signup forms experiencing unusual activity.
- Monitoring for anomaly patterns: same IP verifying many addresses with the same domain.
Rate limiting is also a security feature, not just a cost feature. Unprotected verification endpoints can be used to probe whether specific email addresses exist. Adding per-IP and per-session limits prevents this enumeration without affecting legitimate signup traffic.
Common Implementation Mistakes
Even well-built email verification systems often break down in predictable ways. Below are the most common pitfalls you should actively avoid when implementing an email verification API.
Calling the API from the Browser with Your Secret Key
Anyone who looks at your page source has your API key. Always proxy through your own server.
Hard-Blocking Without a Timeout Fallback
If your form depends on the verifier responding, every API outage breaks every signup.
Treating Risky and Unknown as Undeliverable
Catch-all and anti-probe-provider addresses are common; treating them as hard blocks costs real signups.
Not Debouncing Typing-Time Verification
If you wire the API call without a delay, every keystroke fires a new request. Always debounce by 400–800ms.
Forgetting to Validate Syntax Before the API Call
If the user typed “jane” without an @ symbol, you don’t need an API call to know it’s not valid.
Storing Verification Results Without an Expiration
Mailbox state changes, and outdated records increase the risk of hitting spam traps.
Logging the full verification response, including the email address, in plain text production logs. Verification responses contain PII; treat them with the same care as any other user data. Use structured logging with PII fields tagged for redaction, and don’t print full email addresses to the console in production.
How Do You Test an Email Verification API Integration?
A working integration handles all four primary statuses correctly, plus the timeout case. Most vendors provide test addresses you can use to deterministically trigger each status. EmailVerify.io has a set of test addresses documented in the API reference; if your vendor doesn’t, you can construct equivalents.
The minimum test suite covers:
| Test case | What to send | Expected response |
|---|---|---|
| Valid | A real address you control. | status: Valid |
| Invalid, bad syntax | An address with a missing @ or invalid characters. | status: Invalid, reason: invalid_syntax |
| Invalid, dead mailbox | An invented local part at a real domain. | status: invalid, reason: mailbox_not_found |
| Invalid, no MX | An address at a domain with no MX records. | status: invalid, reason: no_mx |
| Risky, catch-all | An address at a known catch-all test domain. | status: risky, reason: catch_all |
| Risky, disposable | An address at a known disposable provider. | status: risky, reason: disposable |
| Risky, role-based | [email protected] or similar. | status: risky, reason: role_based |
| Verifier timeout | Mock a slow API response in your test setup. | status: unknown, reason: verifier_timeout |
Pre-launch integration checklist:
- API key stored as a server-side environment variable.
- Server-side proxy endpoint set up at /api/verify-email.
- 1–2 second timeout with soft-accept fallback wired in.
- Four-tier UX matrix implemented, with reason-code-specific messages.
- Debouncing applied if verifying during typing.
- Per-IP and per-session rate limiting on the proxy endpoint.
- Cache layer with sensible TTL for retry protection.
- All test cases produce expected UX behavior.
- PII handled correctly in logs (no plaintext email addresses).
How Does EmailVerify.io Support This Pattern?
EmailVerify.io’s API is built around this exact integration pattern. Sub-second responses for most addresses, a structured multi-status output (Valid, Invalid, Catch-All, Disposable, Do Not Mail, Role-Based, Unknown, and Skipped), and clear documentation of which statuses can occur and what they mean.
Full endpoint references, authentication details, sample requests in multiple languages, and the complete status list are on the EmailVerify.io API page and the deeper API documentation. The patterns in this article work directly against that API; the snippets above will run with the right environment variable set and an active key.
If you’re evaluating EmailVerify.io against another vendor, the easiest test is to run the same eight-case test suite from Section 16 against both APIs. The schema, the reason codes, and the latency should match what you’d expect from a production integration.
Frequently Asked Questions
Where Should I Call the Email Verification API in a Signup Flow?
From your application server, not from the browser. The API key is a secret; if you put it in client-side JavaScript, anyone can extract and abuse it. The right pattern is to expose your own /api/verify-email endpoint that proxies the call to the verification API server-side. As for timing, fire the call when the email field loses focus (on blur) so the result is back by the time the user clicks submit.
How Fast Is a Real-Time Email Verification API?
In well-designed APIs, sub-second per address. The bottleneck is the SMTP probe to the recipient mail server, which the API handles with connection pooling, IP rotation, and retry logic. From your application's perspective, a successful call returns in well under a second. Set a 1–2 second timeout to handle the rare cases where the API is slow.
What Should I Do When the API Times Out?
Soft-accept the address with a flag for later bulk re-verification. Treating timeouts as a hard block would prevent legitimate users from signing up during any verifier outage. The 1–2 second timeout combined with a soft-accept fallback is the production pattern; verification should never become the reason a real user can't sign up.
Can I Cache Email Verification Results?
Yes. Use short-lived caching:
- Signup retry: 5 minutes
- Multi-step forms: 15–60 minutes
- Cross-flow use: up to 24 hours
- Long-term storage: avoid caching
Cache only stable results like Valid or Invalid.
Do I Still Need Server-Side Validation If I Use an API?
Yes. Always validate syntax before calling the API, both for cost reasons (don't burn credits on obvious garbage) and for safety (the API is one component of your input handling, not all of it). A simple regex or library check filters out the most obviously malformed inputs; the API takes care of everything else.
Should I Block Disposable Email Addresses?
Usually yes, for signup forms tied to free trials, free accounts, or anything where one user shouldn't have unlimited accounts. Block with a clear message asking for a permanent address. For paid signups or business contexts, the case for blocking is weaker; some legitimate users (privacy-conscious technical users, etc.) use disposable addresses on purpose.
How Does Email Verification Handle Yahoo and AOL Emails?
Honestly, with caveats. Yahoo and AOL deliberately obscure their RCPT TO responses, so a clean, SMTP-level valid answer isn't available for those providers. A good verifier returns "Risky" with a reason code naming the provider so your UX matrix can branch on it. Most teams accept these addresses on signup; engagement signals over time tell you whether the mailbox is real.
Final Thoughts
The email verification API is a small piece of infrastructure that does an outsized amount of work for a signup flow. Wired in correctly, it catches typos, blocks bots, prevents disposable signups, and keeps your contact database clean from the moment of entry. Wired in badly, it slows down forms, blocks real users, leaks API keys, and runs up unexpected bills.
The patterns in this article are the difference. Server-side proxy. Sub-second timeout with soft-accept fallback. Four-tier UX matrix that handles each status with the message that fits. Debouncing on typing-time verification. Rate limiting on the public endpoint. Caching with a sensible TTL. PII safety in logs. Each of these is a small thing on its own; together they’re the production pattern.
The code in this article works. Drop the snippets into your application server, set an environment variable for the API key, and wire the endpoint into your form, and you have a working integration. The harder work is the operational logic around it, and that’s exactly what most of this article has been about. Pick the pieces that fit your stack, ignore the rest, and ship something that protects your data without breaking your funnel.
Cleaner signup data. Fewer typos. No bot accounts. That’s what a trusted email verification service delivers when it’s integrated well.
Get an API key and ship the integration
Grab an API key from the EmailVerify.io API page, drop the Python, Node, or PHP snippet into your server, and your signup form is verifying addresses in production within an hour.


