
Here’s the uncomfortable truth most email dashboards don’t make obvious: “delivered” does not mean your email reached the inbox.
It only means the receiving server accepted the message. After that, it can still end up in spam or promotions or, if you’re sending to addresses that have decayed over time, bounce entirely.
That gap between delivery and actual inbox placement is where most deliverability problems hide.
You can send a campaign that shows a 99% delivery rate and still see weak engagement because a large portion never reached a visible inbox.
So how do you actually verify where your emails are landing?
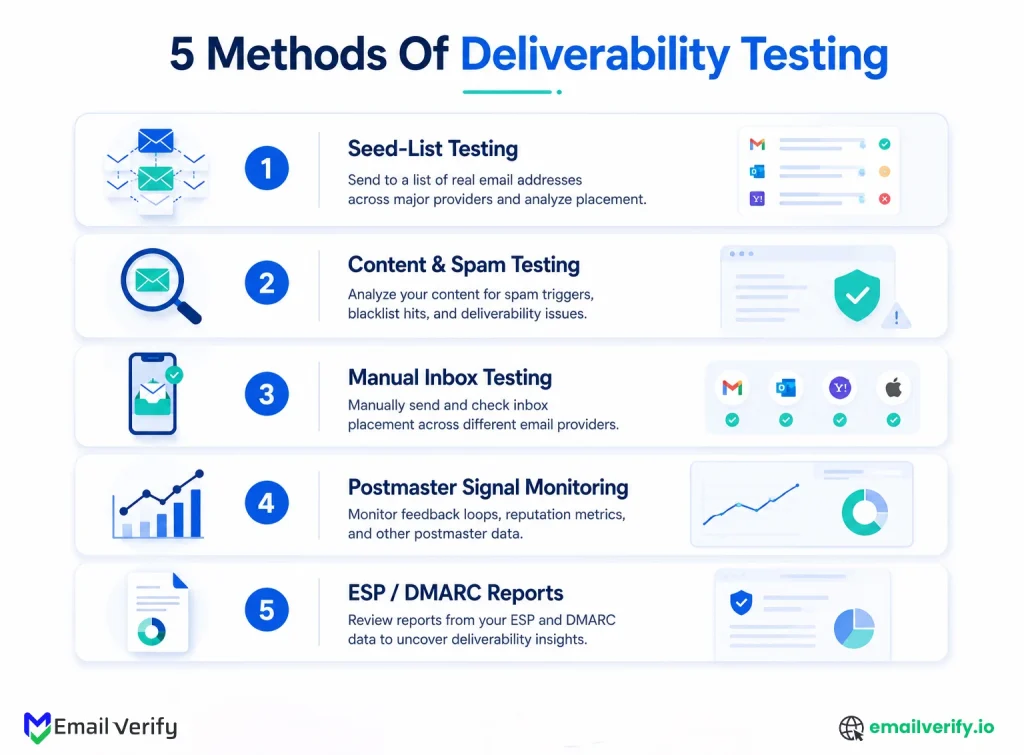
There are five practical ways to test email deliverability, and each one measures a different layer of performance, from inbox placement to sender reputation to technical authentication signals.
This guide breaks down all five methods in detail, what each one tells you, where it falls short, and when to use it so you’re not relying on misleading ESP metrics.
There are five proven ways to test email deliverability:
- Seed-list testing uses test inboxes (like GlockApps or MailReach) to show where emails land (inbox, spam, or promotions).
- Content spam testing tools like Mail-Tester analyze subject lines, links, HTML, and authentication for spam triggers.
- Manual inbox checks, sending emails to real Gmail, Outlook, Yahoo, or iCloud accounts to see actual placement.
- Postmaster tools, Gmail Postmaster Tools, Microsoft SNDS, and Yahoo Sender Hub Insights provide reputation and complaint data.
- ESP logs and DMARC reports, technical data showing bounces, authentication failures, and unauthorized sending activity.
No single method gives the full picture. The most accurate deliverability view comes from combining multiple methods depending on whether you want inbox placement, content validation, or reputation monitoring.
Table of Contents
Email Delivery vs. Inbox Placement: What’s the Difference?
One of the most common misunderstandings in email marketing is assuming that delivery rate and inbox placement mean the same thing; they don’t.
Your ESP might show a 98–99% delivery rate, but that only tells you your emails were accepted by the receiving server. It does not confirm where those emails actually landed.
In reality, an email can be:
- Delivered to the inbox (ideal outcome)
- Delivered to promotions or updates tabs
- Delivered to spam
- Or accepted but never meaningfully seen by the recipient
This is why deliverability testing matters; it focuses on where your emails actually appear, not just whether they were accepted.
Three terms get tossed around like they mean the same thing. They don’t, and the difference matters for everything that follows.
| Term | What it actually means | Where you see it |
|---|---|---|
| Delivery rate | The receiving server didn’t bounce your message. Says nothing about where it ended up. | Standard ESP reporting. |
| Inbox placement | Where the message actually went: primary inbox, promotions, spam, or oblivion. | The five testing methods in this article. |
| Sender reputation | The running score Gmail/Outlook/Yahoo keeps on your domain over weeks. | Postmaster Tools, SNDS, Sender Hub Insights. |
Your ESP showing 99% delivery does NOT mean 99% of your emails reached the inbox. It means 99% of them weren’t hard-bounced. Whatever landed in Spam or Promotions still counts as “delivered” in that dashboard. That’s why so many marketers are surprised when their open rates are weirdly low, the emails technically delivered. They just didn’t arrive anywhere a human would see them.
Why does this matter?
Because delivery alone doesn’t produce business value. An email accepted by Gmail but routed to spam produces zero opens, zero clicks, and zero conversions. But it counts as “delivered.” Healthy programs care about inbox placement specifically, because that’s the thing that correlates with the metrics that actually matter.
What Are the 5 Ways to Test Email Deliverability?
There are five practical methods used to test email deliverability in real-world email marketing and cold outreach programs. Each method measures a different layer, from inbox placement to content filtering to sender reputation. Understanding all five is important because no single method gives a complete picture of deliverability performance.
Here’s the short version of all five before we go deep on each:
| Method | Cost | Setup | What it’s actually good for |
|---|---|---|---|
| Seed-list tests | $10–$300/mo | 30 min | Inbox placement across 30–100+ test inboxes. Catches: provider-specific filtering, content effects on placement. |
| Content spam tests | Free–$50/mo | 1 min | Spam-trigger words, broken HTML, authentication checks. Catches: content-layer issues before you send. |
| Manual inbox checks | Free | 10–20 min | What real recipients see in inboxes you control. Catches: "Does this look right?" gut-checks. |
| Postmaster signals | Free | 1–2 hr setup, weekly review | Domain/IP reputation, complaint rates, compliance status. Catches: long-term sender health. |
| ESP / DMARC reports | Free (with ESP) | Hours of setup | Bounce trends, send error codes, and unauthorized senders spoofing your domain. Catches: technical issues. |
Notice something?
Most of what you need is already free. The postmaster tools, manual checks, and DMARC reports cost nothing. Paid seed-list testing earns its place in specific situations; we’ll get to those, but it’s an addition to a free baseline, not a replacement.
Method 1: Seed-List Testing in Email Deliverability
Seed-list testing is one of the most widely used ways to check email deliverability because it shows exactly where your email lands across different email providers.
One thing worth checking before building your seed list: if your sending domain is brand new and hasn’t been warmed up, scores will look worse than they should. Similarly, if your list contains catch-all email addresses, you may see inconsistent placement results across providers since catch-alls accept everything at the server level without confirming the mailbox exists.
These inboxes are monitored to see whether your email lands in:
- Primary inbox
- Promotions tab
- Spam folder
- Or gets blocked entirely
Tools like GlockApps, MailReach, and Validity Everest use this method to simulate inbox placement across Gmail, Outlook, Yahoo, and other providers.
How Does Seed-List Testing Work?
Here’s the basic process:
- You upload or select a seed list (test inboxes provided by the tool)
- You send your email campaign as usual
- The tool checks where the email lands in each inbox
- You get a report showing inbox placement rates by provider
Most platforms will break results down into the following:
- Gmail inbox vs. spam
- Outlook inbox vs. spam
- Yahoo inbox vs. spam
- Missing or blocked emails
This gives a snapshot of how mailbox providers are treating your email at the time of sending.
What Seed-List Testing Is Good At
Seed list testing is useful for:
- Identifying provider-specific filtering issues. (e.g., Gmail looks fine but Outlook sends to spam.)
- Checking pre-send campaign performance.
- Spotting early deliverability problems before scaling a campaign.
- Comparing how different subject lines or templates perform.
It’s especially useful for cold outreach and high-volume campaigns where small changes can significantly affect inbox placement.
Limitations of Seed-List Testing
While useful, seed tests have important limitations:
- Seed inboxes are not real subscribers, so they don’t behave like real users
- They don’t reflect engagement signals (opens, replies, clicks)
- Sample sizes are small compared to real campaigns
- Results can vary depending on provider filtering behavior for test addresses
- They don’t fully reflect performance at scale
This means a good seed test result does not guarantee strong performance with your real audience.
When You Should Use It
Seed list testing is most valuable when:
- You’re launching a new email campaign or template.
- You’re troubleshooting deliverability issues.
- You’re running cold outreach at scale.
- You want provider-level visibility before sending to a large list.
It should be treated as a diagnostic tool, not a final verdict on deliverability.
GlockApps maintains 100+ seed addresses across major ISPs worldwide. MailReach focuses its seed list on professional inboxes (Google Workspace, Office 365). Validity, Everest, and Mailtrap operate similar but proprietary panels. Spam testing pricing typically starts around $9.60/month (MailReach 25 tests) and scales up to several hundred per month for higher-volume testing.
Sources: GlockApps documentation; MailReach pricing; Mailtrap deliverability tools comparison 2026.
Method 2: Content Spam Testing for Email Deliverability
Content spam testing is used to evaluate whether the content of your email is likely to trigger spam filters before you send it to your audience.
It focuses on the message itself, not your audience or sender reputation, and checks things like:
- Subject line wording
- Link quality
- HTML structure
- Image-to-text ratio
- Email authentication setup (SPF, DKIM, DMARC)
Tools like Mail-Tester, Postmark Spam Check, and similar spam analysis tools are commonly used for this method.
How Content Spam Testing Works
The process is simple:
- You send your email to a test address provided by the tool.
- The tool analyzes your message against spam-filtering rules.
- You receive a score (often out of 10) plus a breakdown of issues.
- You fix flagged issues before sending to your real list.
Most tools evaluate your email using rule-based systems similar to SpamAssassin and mailbox provider filtering logic.
What These Tools Actually Check
Content spam testing tools typically analyze the following:
- Spam-trigger words (e.g., overly promotional or aggressive phrasing)
- Subject line structure (caps, symbols, urgency patterns)
- Authentication setup (SPF, DKIM, DMARC alignment)
- Link reputation (whether URLs are trusted or blacklisted)
- HTML formatting issues (broken tags, missing alt text)
- Image-heavy layouts (low text ratio increases spam risk)
These checks help identify obvious content issues that could harm deliverability.
What a “10/10 Score” Really Means
A common misconception is that a perfect score guarantees inbox placement; it doesn’t.
A high score (like 10/10 on Mail-Tester) only means the following:
- Your email passed basic content and authentication checks
- There are no obvious spam-triggering issues
It does not guarantee:
- Inbox placement in Gmail, Outlook, or Yahoo
- Strong sender reputation
- High engagement or opens
In other words, it measures content quality compliance, not real-world deliverability.
Strengths of Content Spam Testing
This method is useful because it:
- Quickly identifies obvious spam triggers
- Helps validate email structure before sending
- Ensures authentication records are correctly configured
- Acts as a fast pre-send quality check
- Is usually free or low-cost
It’s especially helpful during campaign creation and template testing.
Limitations You Should Know
Content spam testing does NOT:
- Measure inbox placement
- Reflect sender reputation
- Account for engagement signals (opens, replies, clicks)
- Simulate real mailbox provider behavior
- Predict performance at scale
This means a “perfect” score can still result in emails landing in spam if your domain reputation is weak or your list quality is poor.
Use content spam tests during creative QA, not as your primary deliverability monitoring tool. They’re great at catching issues before you send (when fixing is cheap) and basically useless at telling you what happened after you send (which is when knowing the placement actually matters). Pair them with seed list testing on the actual creative, and you get a much fuller picture than either method alone.
Method 3: Manual Inbox Checks for Email Deliverability
Manual inbox checking is the simplest and most direct way to test email deliverability because it shows you exactly how your email appears in real inboxes.
Instead of relying on tools or simulations, you send your email to real email accounts you control, such as Gmail, Outlook, Yahoo, or iCloud, and check where it lands.
This method helps you understand the actual user experience, including whether your email appears in the inbox, promotions tab, or spam folder.
How Manual Inbox Checks Work
The process is straightforward:
- Create or use test email accounts across major providers (Gmail, Outlook, Yahoo, etc.)
- Add these accounts as recipients in your campaign.
- Send your email normally.
- Open each inbox and check where the email landed.
- Review how the email renders across different devices and providers.
You’re essentially acting as your own test audience.
What Manual Checks Help You See
Manual inbox testing gives you real-world visibility into:
- Inbox placement (Primary, Promotions, Spam)
- How subject lines appear in different providers
- Email rendering on desktop vs mobile
- Image loading and formatting issues
- Broken layouts or inconsistent styling
It’s the closest you can get to the actual subscriber experience without sending to your full list.
Why This Method Is Important
Unlike automated tools, manual checks show you:
- What real inbox behavior looks like.
- How different providers treat the same email.
- Whether your email design breaks in certain environments.
This makes it especially useful for:
- High-stakes campaigns
- Transactional emails (password resets, confirmations)
- New template launches
- Deliverability troubleshooting
Limitations of Manual Inbox Checks
While valuable, this method has clear limitations:
- Small sample size (a few test accounts only).
- Cannot represent large-scale audience behavior.
- No visibility into sender reputation or backend filtering logic.
- Results can be skewed if test accounts are overengaged.
Because of this, manual checks should not be used as the only deliverability test.
Keep a small panel of “observe only” test accounts. Don’t open the messages, don’t click anything, and don’t mark them as not-spam. Just check where they landed. This keeps the engagement signals neutral and produces more representative placement data than test accounts that look like your most engaged subscribers ever.
Method 4: Gmail, Microsoft, and Yahoo Postmaster Tools
Postmaster tools provide direct feedback from mailbox providers themselves about how they view your sending domain and IP reputation. Unlike seed tests or spam tools, these signals come from the actual inbox providers, Gmail, Microsoft Outlook, and Yahoo, making them one of the most authoritative sources of deliverability data.
These tools help you understand long-term sender health, not just individual campaign performance.
The Three Main Postmaster Tools
1. Gmail Postmaster Tools
Gmail Postmaster Tools shows how Google views your sending domain and IP reputation. It provides data on:
- Domain and IP reputation (High, Medium, Low)
- Spam complaint rates
- Authentication success (SPF, DKIM, DMARC)
- Delivery errors and rejection trends
- Compliance with Gmail bulk sender requirements
2. Microsoft SNDS (Smart Network Data Services)
Microsoft SNDS provides insights into how Outlook and Hotmail systems treat your emails. It shows:
- IP reputation scoring (Green, Yellow, Red)
- Spam filter classification signals
- Traffic patterns from your sending IPs
- Possible spam trap or abuse indicators
3. Yahoo Sender Hub Insights
Yahoo Sender Hub Insights provides delivery and reputation data for Yahoo Mail domains. It includes:
- Domain reputation signals
- Spam complaint rates
- Authentication performance
- Inbox delivery behavior trends
Yahoo Sender Hub Insights launched October 23, 2025. It provides aggregated delivery statistics for verified DKIM domains, with data populating within 24–48 hours for domains meeting Yahoo’s minimum daily volume threshold. Crucially, Yahoo calculates the spam complaint rate from inbox-delivered mail only, not total sent. That methodology shift means Yahoo’s complaint numbers will look different (and arguably more accurate) than what your ESP reports.
Sources: Mailgun Yahoo Sender Hub Insights launch announcement; Validity Q&A on Yahoo Insights and Postmaster Tools v2.
Why Are Postmaster Tools Important?
Postmaster tools are valuable because they show:
- How mailbox providers perceive your sending reputation over time.
- Whether your domain is building or losing trust.
- Early warning signs of deliverability degradation.
- Authentication and compliance issues before they impact inbox placement.
They act as a long-term health dashboard for your email program.
Limitations of Postmaster Data
Despite their importance, these tools have limitations:
- Data is aggregated, not per campaign.
- Requires a minimum sending volume to display insights.
- Data is delayed (typically 24–48 hours).
- Only covers major providers (no visibility into smaller inboxes).
This means they are not suitable for real-time campaign troubleshooting.
When You Should Use Postmaster Tools
Postmaster signals are most useful for:
- Monitoring long-term sender reputation.
- Tracking deliverability trends over time.
- Identifying compliance issues early.
- Managing large-scale email programs or domains.
They should be treated as a strategic monitoring layer, not a campaign-level testing tool.
Method 5: ESP Logs and DMARC Reports for Email Deliverability
ESP logs and DMARC reports provide the technical and diagnostic layer of email deliverability, showing what actually happened after your email was sent.
While other methods focus on inbox placement or reputation, this method focuses on delivery mechanics, authentication, and system-level failures. It helps you understand if your email was:
- Delivered successfully
- Blocked or rejected by the receiving server
- Flagged due to authentication issues
- Or sent from an unauthorized source
1. ESP Delivery Logs (Email Service Provider Logs)
Your email service provider (ESP) records detailed logs for every email you send. These logs typically show:
- Delivery status (delivered, bounced, deferred)
- Bounce reasons (hard vs. soft email bounces)
- SMTP error codes
- Spam rejection messages from receiving servers
- Complaint rates (if supported by ESP)
What ESP Logs Help You Identify
ESP logs are especially useful for spotting:
- High bounce rates (bad or outdated email lists)
- Server-level rejection issues (5xx or 4xx errors)
- Sudden spikes in delivery failures
- Provider-specific blocking patterns
A rising bounce rate is often one of the earliest warning signs of list quality or deliverability problems.
2. DMARC Aggregate Reports
DMARC reports are generated by receiving mail servers and sent back to the domain owner. They show how your domain is being used across the email ecosystem.
These reports include:
- All servers sending email on behalf of your domain
- Whether SPF and DKIM passed or failed
- Volume of emails sent per source IP
- Authentication alignment results
- Suspicious or unauthorized sending activity
Why DMARC Reports Matter
DMARC reports are critical for:
- Detecting email spoofing or unauthorized senders
- Ensuring proper SPF, DKIM, and DMARC alignment
- Monitoring domain-level email security
- Identifying authentication failures that affect deliverability
Most teams overlook DMARC data, but it is one of the most important layers for protecting sender reputation.
Tools Used to Read DMARC Reports
Raw DMARC data is complex (XML format), so most teams use tools like:
- DMARCian
- EasyDMARC
- Valimail
- Postmark DMARC Digests
These tools convert raw reports into readable dashboards and alerts.
Limitations of ESP Logs and DMARC Reports
While powerful, this method does NOT show:
- Inbox vs spam placement
- User engagement (opens, clicks, replies)
- Real-time deliverability performance
- Subject line or content effectiveness
They are purely technical and infrastructure-focused signals.
When Should You Use This Method?
ESP logs and DMARC reports are most useful for:
- Diagnosing bounce and delivery failures
- Monitoring authentication issues (SPF, DKIM, DMARC)
- Detecting unauthorized email sending
- Tracking list quality health
- Investigating deliverability drops at the system level
Which Email Deliverability Test Method Is Best? (Comparison)
No single email deliverability testing method gives a complete picture on its own.
Each method measures a different layer of deliverability, from inbox placement to sender reputation to technical delivery issues.
The best approach is to understand what each method catches, so you can combine them based on what you’re trying to diagnose.
Before you compare them side by side, it helps to first see how each method performs across the different signals that actually matter in deliverability analysis.
| What You Want to Know | Seed-List Testing | Content Spam Testing | Manual Inbox Checks | Postmaster Tools | ESP Logs + DMARC |
|---|---|---|---|---|---|
| Inbox vs. spam placement | Strong | No | Strong | Indirect | No |
| Provider-specific filtering | Yes | No | Yes | Yes | No |
| Content-related issues | Partial | Strong | Partial | No | No |
| Sender reputation trends | Limited | Limited | No | Strong | No |
| Authentication issues | Partial | Partial | No | Strong | Strong |
| Bounce and delivery failures | No | No | No | Limited | Strong |
| Spam complaints | Limited | No | No | Strong | Strong |
| Real user experience | No | No | Strong | No | No |
| System-level issues | No | No | No | Partial | Strong |
- Seed-list testing: Shows where emails land across providers. (Strong for Inbox Placement, No for Sender Reputation/Technical Health).
- Content spam testing: Evaluates whether content triggers filtering rules. (Strong for Content Check, Partial for Inbox Placement/Technical Health).
- Manual inbox checks: Reflect real-world recipient experience. (Strong for Inbox Placement, No for Sender Reputation/Technical Health).
- Postmaster tools: Reveal long-term sender reputation trends. (Strong for Sender Reputation, Partial for Technical Health).
- ESP logs and DMARC reports: Expose technical delivery and authentication issues. (Strong for Technical Health and Performance, Partial for Sender Reputation).
Email deliverability is not a single metric; it is a layered system of signals across content, reputation, infrastructure, and user behavior. That’s why relying on only one method often leads to incomplete or misleading conclusions.
Which Email Deliverability Testing Stack Should You Use?
The right deliverability setup depends on the type of email program you run. Instead of using every method at once, it’s more effective to map each method to your specific use case and risk level.
If you’re running newsletters or marketing email
Before looking at the detailed breakdown, it helps to see what a stable marketing-focused deliverability setup typically includes across all major signals.
| Method | How often | Why |
|---|---|---|
| Gmail Postmaster + Microsoft SNDS + Yahoo Sender Hub | Weekly review. | Always-on baseline. Free. Catches reputation drift before it becomes a problem. |
| ESP delivery logs + DMARC reports | Continuous; review weekly. | Bounce trends, authentication health, and any unauthorized senders show up here first. |
| Mail-Tester (or similar) | Per major campaign. | Quick content QA before send. Takes a minute. |
| Manual inbox check | Per major campaign. | Confirms what real recipients see. The actual ground truth. |
| Seed-list test | Quarterly or for big launches. | Provider-specific placement audit. Not needed every send. |
If you’re doing cold outbound or ABM
Cold email programs require more frequent monitoring because reputation can change quickly based on list quality and engagement behavior.
| Method | How often | Why |
|---|---|---|
| Gmail Postmaster + Microsoft SNDS | Daily review during active campaigns. | Cold outbound burns reputation faster. You want to catch drift quickly. |
| Seed-list test (B2B-focused) | Weekly during ramp; biweekly steady state. | B2B-focused seed lists matter because cold-mail risk is higher. |
| Manual inbox check at corporate test accounts | Per campaign or every 2–3 days. | Where your real audience lives. Verify directly. |
| ESP / sending-tool delivery logs | Continuous. | Bounce rate is the leading indicator of list quality issues. Catch them fast. |
| Content spam test | Per significant template change. | Cold cadences run for weeks. Content errors compound. |
If you’re mostly sending transactional email
Transactional email systems prioritize reliability and authentication over engagement or campaign performance.
| Method | How often | Why |
|---|---|---|
| Postmaster signals (all three) | Weekly review. | Reputation matters most for transactional. Users notice failures fast. |
| DMARC reports | Weekly review. | Transactional often runs from multiple servers. Auth gaps are common. |
| ESP delivery logs | Continuous; alert on bounce-rate spikes. | Transactional bounces usually indicate data issues. Fix at the source. |
| Manual inbox check at major providers | When deploying new templates. | Verify password resets, confirmations, etc. land in the right place. |
If you’re actively troubleshooting a deliverability problem
When deliverability drops, you need a structured diagnostic sequence instead of routine monitoring.
| Method | How often | Why |
|---|---|---|
| Seed-list test with all major providers | Run immediately. | Quickest way to see where the problem is concentrated. |
| Postmaster signals (all three) | Daily during recovery. | Track reputation rebuild over weeks. |
| Content spam test | On every campaign during recovery. | Rule out content as a contributor. |
| DMARC reports | Daily during recovery. | Check for unauthorized senders that might have caused the problem. |
| Manual inbox check | After every recovery campaign. | Confirm the rebuild is producing real results, not just nicer dashboard numbers. |
How Often Should You Test Email Deliverability?
The frequency of email verification and deliverability testing depends on how often you send emails, how sensitive your campaigns are, and how quickly issues need to be detected. Below is a practical schedule:
Instead of running all tests randomly, the most effective approach is to assign each method a clear monitoring rhythm based on its purpose.
Below is a practical schedule used in real email programs.
| When | What to do | How long |
|---|---|---|
| Continuously | ESP delivery logs (with alerts on bounce/complaint thresholds). | Set once, monitor by exception. |
| Daily | Quick scan of Gmail Postmaster compliance status. | 30 seconds. |
| Weekly | Full review of Gmail Postmaster, Microsoft SNDS, Yahoo Sender Hub Insights. | 10–15 minutes. |
| Per campaign | Content spam test (Mail-Tester or similar). | 1–2 minutes. |
| Per major campaign | Manual inbox check at 4–6 test accounts. | 10–15 minutes. |
| Monthly | DMARC aggregate report review (via DMARC processor). | 20–30 minutes. |
| Quarterly | Seed-list test for placement audit. | 30 minutes plus ~$10–50. |
| Quarterly | Bulk re-verification of subscriber list. | Depends on list size. |
| Annually | DMARC policy progression review (p=none → quarantine → reject). | 30 minutes. |
A well-structured deliverability program usually requires only the following: background monitoring for system health, weekly reputation tracking, pre-send validation checks, and occasional deep audits. This balance ensures you catch issues early without overloading your workflow with unnecessary testing.
Common Email Deliverability Testing Mistakes to Avoid
In real-world email programs, I consistently see teams relying too heavily on one method, misinterpreting scores, or skipping foundational monitoring steps.
- Relying on a single test method: Mail-Tester catches content issues; it doesn’t see reputation, engagement, or actual placement. The answer is layering.
- Treating a 10/10 score as a passing grade: Mail-Tester’s analysis acknowledges that a 10/10 score means “the content passed our filter rules.” It doesn’t guarantee inbox placement.
- Ignoring First-Party Postmaster Data: Setting up Postmaster Tools takes about 30–60 minutes. Most teams that struggle with deliverability never set these up.
- Testing on a fresh domain with no warm-up: New domains face about a 30 percentage point inbox placement penalty in their first 30 days. Warm the domain first, then test.
- Misreading Aggregate Metrics as Campaign Performance: Aggregate dashboards smooth over the spikes that mailbox providers actually react to. Always look at per-campaign metrics.
- Letting test accounts become “super-engaged”: If your test accounts always open your messages, providers classify them as engaged senders, making results artificially favorable.
- Confusing delivery rate with inbox placement: Your ESP’s 99% delivery rate doesn’t mean 99% of your emails reached the inbox. It means 99% of them weren’t hard-bounced.
How Does Email Verification Impact Deliverability Testing?
Email verification sits before deliverability testing in the email lifecycle. While deliverability testing shows where emails land, verification determines whether they should have been sent at all.
This matters because many deliverability issues start at the list level, not at the sending or content level. Invalid or risky addresses introduce bounce risk and distort performance signals before any testing even begins.
In practice, verification acts as a preventive layer that protects sender reputation and improves the accuracy of deliverability testing.
It typically happens in three stages:
- Real-time verification at signup to block invalid or disposable emails.
- Bulk verification before importing third-party or older lists.
- SMTP verification before list sends
Once this is in place, deliverability testing becomes more reliable. Seed tests, postmaster tools, and ESP logs all reflect cleaner, more accurate data.
Together, verification and testing form a simple flow: verification protects inputs, and testing evaluates outputs. Without both, deliverability insights stay incomplete.
Verification and testing answer different questions. Verification asks, “Are these addresses real?” Testing asks, “Where does our mail actually land?” Both matter. Skip verification and you’ll produce hard bounces that no test can prevent; skip testing and you won’t know whether your verified mail is reaching the inbox.
Frequently Asked Questions (FAQs)
What Is Email Verification?
Email verification is the process of checking whether an email address is valid and capable of receiving messages before sending. It helps reduce bounce rates, remove invalid or risky addresses, and protect sender reputation.
What Is the Difference Between Email Verification and Deliverability Testing?
Email verification happens before sending and ensures email addresses are valid. Deliverability testing happens after sending and shows where emails are delivered. Verification protects input quality, while testing evaluates output performance.
Is GlockApps Worth Paying For?
GlockApps is worth paying for if you are running email campaigns at scale, troubleshooting deliverability issues, or managing cold outbound where visibility across multiple mailbox providers is important. For most mid-market programs, free tools like Gmail Postmaster Tools, Microsoft SNDS, and Yahoo Sender Hub Insights, combined with periodic seed testing, provide enough insight. Paid plans typically start around $59/month for advanced testing features.
How Do You Check Email Deliverability For Free?
You can check email deliverability for free by using Gmail Postmaster Tools, Microsoft SNDS, and Yahoo Sender Hub Insights for reputation monitoring. Mail-Tester can be used for content checks before sending, while manual inbox testing across major providers helps validate real-world placement. ESP logs and DMARC reports also provide ongoing technical visibility without additional cost.
What Is A Good Email Deliverability Rate?
A healthy inbox placement rate is typically between 85% and 95% for established senders with proper authentication and good list quality. The industry average is around 83%. Anything below 80% inbox placement usually indicates deliverability issues that need investigation. Note that ESP delivery rates are different and often higher because they include emails that land in spam.
How Often Should You Test Email Deliverability?
Deliverability should be monitored continuously through postmaster tools and ESP or DMARC reports, reviewed weekly. Content spam testing should be done before every major campaign. Manual inbox checks are best used for important sends. Seed-list testing is typically done quarterly for stable programs and more frequently during troubleshooting.
How Long Does It Take To Fix Deliverability After A Test Shows Issues?
The time to fix deliverability depends on the root cause. Authentication issues like SPF, DKIM, or DMARC can be resolved quickly once identified. List quality problems improve after cleaning and verification. Reputation issues take longer, usually 2 to 4 weeks for recovery, while severe reputation damage may require 8 to 12 weeks of consistent sending and engagement rebuilding.
Wrapping Up
Email deliverability testing only works when it’s treated as a system, not a single tool or metric. Each method, including seed-list tests, postmaster data, ESP logs, manual checks, and content scans, reveals a different part of how inbox providers treat your emails.
No single method gives you the full picture. Some measure reputation, some measure content quality, and others show real inbox placement. The value comes from combining them in a structured way rather than relying on one signal in isolation.
At the same time, none of these methods are effective if the input data is weak. That is where email verification fits in. This is also why following best practices to improve email deliverability becomes critical before scaling any sending strategy.
A strong email program is built in two layers:
- verification to protect what goes in
- testing to understand what happens next
When both are in place, deliverability becomes more predictable, easier to diagnose, and far more stable over time.
If you are setting up your stack from scratch, start by establishing clean data through verification, then layer in postmaster monitoring and periodic testing. That order matters more than the tools themselves.
Test your inputs before testing your outputs
Before running another deliverability test, verify the list you’re sending to. Run a sample of your active subscribers through EmailVerify.io verification, or wire up the verification API into your signup form in an afternoon.
Cleaner inputs make every deliverability test more meaningful and catch the bounce damage no test can prevent after the fact.


